Leprechaun Paper Plate Craft
This Leprechaun Paper Plate Craft is the perfect St. Patrick's day activity for you and your kids to do!
Equipment
- Crayola Construction Paper
- 50 Pcs Flat Paint Brushes
- Lily 10200101628 Sugar 'N Cream The Original Solid Yarn, 2.5oz, Medium 4 Gauge, 100% Cotton - Hot Orange - Machine Wash & Dry
Ingredients
- Paper plate
- Paint pink and orange
- Paint brush
- Orange yarn
- Single hole puncher
- Construction papers green, yellow, & black
- Scissor
- Marker
- Orange pom pom balls
Instructions
- Let us start this Leprechaun Paper Plate Craft activity by mixing some paint! Mix the pink and orange paint until you are satisfied with the color.
- Once the paint has dried up, use the single-hole puncher and make two layers of punched holes into the plate but leave 1/4 space at the top of the paper plate without any holes.
- Sew the orange yarn into the holes you made.
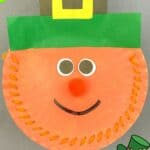
- For the next step, get the construction papers and cut them to form a hat shape. Assemble the pieces together as shown in the image below. Attach it to the paper plate once done.
- Now, let’s make the eyes of our leprechaun. Cut two circles each from the black construction paper and bond paper but the white circle must be bigger. Glue them together then attach them to the paper plate.
- Now for the last step, add the pom pom balls and make the leprechaun happy with a smile using the marker.